Vendor Integrations
Configuration > Vendors > Vendor Integrations
Vendor Integrations allow TITAN to send vendor orders directly to the vendor's system.

-
Name - search by name
-
Include Inactive - check to include inactivated integrations
-
Reset - click to reset search parameters
-
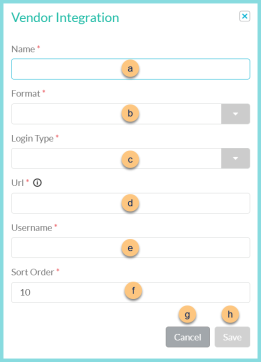
Add New Vendor Integration - click to add a new integration
-
Name - enter integration name
-
Format - select existing vendor integration format
-
Login Type - choose a login type for file transfer (Key File, Encrypted Key File, Password)
-
Url - enter the URL for the server. Hover over the (i) for details.
-
Username - enter the username for the file transfer
KeyFile (not pictured, keyfile and encrypted keyfile types only) - enter the keyfile
Password (not pictured, password and encrypted keyfile types only) - enter the password
Email (not pictured, dependent upon Format selected) - enter email
-
Sort Order - change sort order if needed
-
Cancel - click to return to the previous screen without saving changes
-
Save - click to save changes
-
-
Name - click to sort by name
-
Vendor Format - click to sort by vendor format
-
Active - click to sort by active status
-
Pencil - click to edit existing integration
-
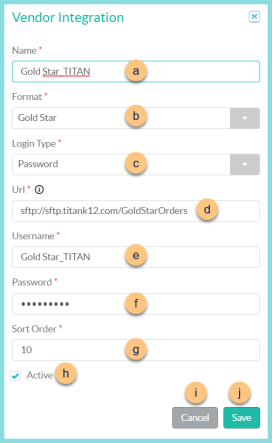
Name - enter integration name
-
Format - select existing vendor integration format
-
Login Type - choose a login type for file transfer (Key File, Encrypted Key File, Password)
-
Url - enter the URL for the server. Hover over the (i) for details.
-
Username - enter the username for the file transfer
KeyFile (not pictured, keyfile and encrypted keyfile types only) - enter the keyfile
-
Password (not pictured, password and encrypted keyfile types only) - enter the password
Email (not pictured, dependent upon Format selected) - enter email
-
Sort Order - change sort order if needed
-
Active - toggle active status
-
Cancel - click to return to the previous screen without saving changes
-
Save - click to save changes
-
-
< > - click to scroll through pages
Existing Vendor Integrations Required Fields
Some vendor integrations require additional data points to be configured. The following fields are found on the Vendor's General tab, and need to be configured as specified for proper order file formatting.
| Vendor | Division | Trading Partner Identifier |
|---|---|---|
| Shamrock | 3-digit code AZ - 002 CO - 003 |
n/a |
| Sysco | 3-digit code | n/a |
| US Foods | 4-digit code | All caps 8 characters (ECXXXXXX) This is the same as the username for the FTP site. |